
Self-Hosting Guide
Deploy your own Go Bananas! instance on Cloudflare.
Overview
Go Bananas! is designed for easy self-hosting on Cloudflare's edge infrastructure. This guide covers everything you need to deploy and operate your own instance.
Architecture Requirements
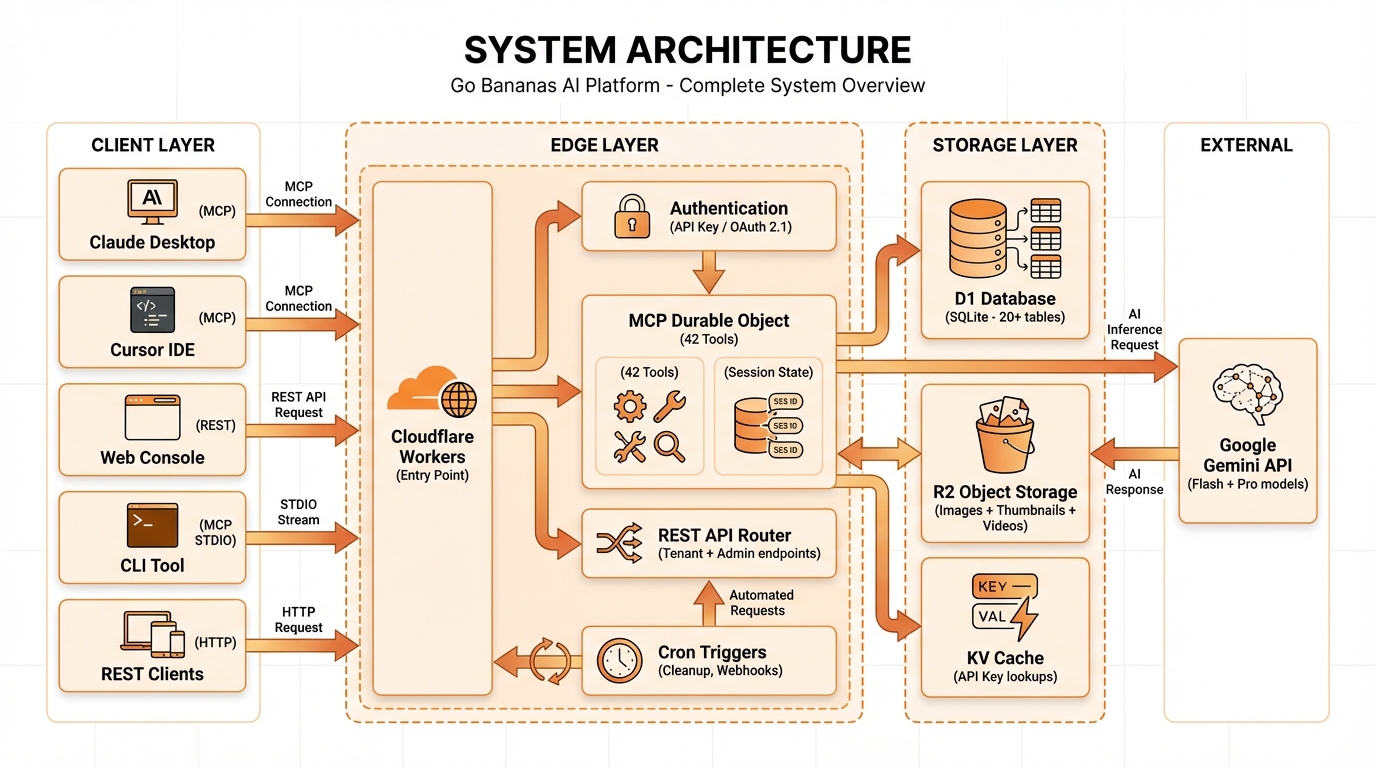
Workers, Durable Objects, D1, R2, KV, and a multi-provider model registry (Gemini Flash Lite, Flash and Pro; OpenAI GPT Image 2 and 2.5)
Prerequisites
Required Accounts
| Service | Purpose | Cost |
|---|---|---|
| Cloudflare Account | Host all infrastructure | Free tier available |
| Google AI Studio | Gemini API access (Flash + Pro) | Pay per use |
| OpenAI Platform (optional) | GPT Image 2 / 2.5 access | Pay per use (token-priced for text/image input and image output) |
Required Tools
bash
# Node.js 24
node --version

# npm or pnpm
npm --version

# Wrangler CLI
npm install -g wrangler

# Verify wrangler
wrangler --versionCloudflare Plan Requirements
| Feature | Free Tier | Paid Workers |
|---|---|---|
| Workers requests | 100K/day | 10M/month |
| Durable Objects | ✅ | ✅ |
| D1 Database | 5GB | 5GB+ |
| R2 Storage | 10GB | Pay per use |
| KV Storage | 1GB | 25GB+ |
Recommendation
The free tier is sufficient for development and small-scale production. For larger deployments, consider the Workers Paid plan ($5/month).
Quick Start
1. Clone Repository
bash
git clone https://github.com/davendra/go-bananas-app.git
cd go-bananas-app
npm install2. Authenticate with Cloudflare
bash
wrangler login3. Create Resources
bash
# Create D1 database
wrangler d1 create go-bananas-db

# Create R2 bucket
wrangler r2 bucket create go-bananas-images

# Create KV namespaces
wrangler kv:namespace create API_KEYS
wrangler kv:namespace create TENANT_CONFIG4. Configure wrangler.jsonc
Update with your resource IDs:
jsonc
{
  "name": "go-bananas",
  "main": "src/index.ts",
  "compatibility_date": "2024-01-01",

  "d1_databases": [
    {
      "binding": "DB",
      "database_name": "go-bananas-db",
      "database_id": "your-database-id"
    }
  ],

  "r2_buckets": [
    {
      "binding": "R2_IMAGES",
      "bucket_name": "go-bananas-images"
    }
  ],

  "kv_namespaces": [
    {
      "binding": "API_KEYS",
      "id": "your-api-keys-kv-id"
    },
    {
      "binding": "TENANT_CONFIG",
      "id": "your-tenant-config-kv-id"
    }
  ],

  "durable_objects": {
    "bindings": [
      {
        "name": "MCP_OBJECT",
        "class_name": "GoBananasMcpAgent"
      }
    ]
  },

  "vars": {
    "ENVIRONMENT": "production",
    "LOG_LEVEL": "info",
    "R2_PUBLIC_URL": "https://pub-xxx.r2.dev"
  }
}5. Initialize Database
bash
npm run db:init6. Set Secrets
bash
# Generate encryption key
openssl rand -hex 32

# Set encryption key
wrangler secret put ENCRYPTION_KEY
# Paste: your-64-character-hex-key

# Set admin token
wrangler secret put ADMIN_TOKEN
# Paste: your-admin-token7. Deploy
bash
npm run deploy8. Create First Tenant
bash
npm run setup-tenantDeployment Options
Option A: Fresh Deployment
Best for new installations:
bash
# Full setup from scratch
npm install
npm run db:init
npm run deploy
npm run setup-tenantOption B: Fork & Customize
Best for organizations wanting modifications:
- Fork the repository
- Customize as needed
- Set up CI/CD (see below)
- Deploy via GitHub Actions
Option C: Multi-Environment
Best for development workflows:
bash
# Development environment
wrangler deploy --env development

# Staging environment
wrangler deploy --env staging

# Production environment
wrangler deploy --env productionCI/CD Setup
GitHub Actions
Create .github/workflows/deploy.yml:
yaml
name: Deploy to Cloudflare

on:
  push:
    branches: [main]
  workflow_dispatch:

jobs:
  deploy:
    runs-on: ubuntu-latest
    steps:
      - uses: actions/checkout@v7

      - name: Setup Node.js
        uses: actions/setup-node@v7
        with:
          node-version: '24'
          cache: 'npm'

      - name: Install dependencies
        run: npm ci

      - name: Type check
        run: npm run typecheck

      - name: Run tests
        run: npm test

      - name: Deploy
        uses: cloudflare/wrangler-action@v3
        with:
          apiToken: ${{ secrets.CLOUDFLARE_API_TOKEN }}
          secrets: |
            ENCRYPTION_KEY
            ADMIN_TOKEN
        env:
          ENCRYPTION_KEY: ${{ secrets.ENCRYPTION_KEY }}
ADMIN_TOKEN: ${{ secrets.ADMIN_TOKEN }}Required Secrets
Set in GitHub repository settings:
| Secret | Description |
|---|---|
CLOUDFLARE_API_TOKEN | Cloudflare API token with Workers edit permission |
ENCRYPTION_KEY | 256-bit hex encryption key |
ADMIN_TOKEN | Admin API authentication token |
What's Next
After deployment:
- Configure R2 public access → Configuration
- Create tenants → Tenant Management
- Set up monitoring → Operations
- Scale as needed → Scaling
Deployment Checklist
- [ ] Cloudflare account created
- [ ] Wrangler CLI installed and authenticated
- [ ] D1 database created
- [ ] R2 bucket created
- [ ] KV namespaces created
- [ ] wrangler.jsonc configured
- [ ] Database initialized
- [ ] Secrets set (ENCRYPTION_KEY, ADMIN_TOKEN)
- [ ] Worker deployed
- [ ] First tenant created
- [ ] Verified functionality